NFC Badge App User Manual
0-0.
Getting Started
- Get a brand new NFC Badge Card.
- Download and install the APP named [NFC Badge], current version: $ iOS$ version 1.24 | $ Android$ version 0.24.0
0-1.
Startup and create your digital name card
- If you want to confirm the current App version number, please click the menu icon in the upper right corner of the "Badge" homepage after the App is launched, and the tool menu will slide out on the left. The version number displayed below the NFC-TO-GO logo is the version number.
- Before operating the App, you can click "Check Online Manual" at the bottom of the homepage to refer to the online version of the manual.
- Press SCAN NOW and you will be asked to enter a password to unlock Card; the new card password is preset to 00000000 .
- After entering and confirming the password, press SUBMIT. A prompt for "Scan NFC Tag" will pop up. Please bring and hold the new card close to the antenna of the mobile phone and let it scan. After completing the unlocking, you can enter the "My Data" page (Fig. 0-2).
- Press EDIT MY DATA and you will be directed to the "Badge Info" page in the cloud backend. Please fill in your public information, add images, ...etc. in each field, and finally click OK to complete editing.
- It is recommended that you change the password first . After completing the change, please remember the password for this access. Once lost or forgotten, there will be no backup on the system side, so please be careful.
- After the new version 0.4.0, a new "Function Switch" is added at the bottom of the homepage. You can tap NFC to write general NFC tags. For usage instructions, please refer to the instructions in Section 0-5 .
$
$ Fig.0-1
0-2.
Edit My Card Information
It is very simple to complete my BADGE card opening, but you may need to spend more time to decorate it properly. To enter the "My Data" page again, you must also scan your Badge card in the [NFC Badge] APP to log in. The procedure is as above. Next, let’s take a closer look at the functions of each field of Badge content and its final appearance:
- Image - You can choose to upload the photo using the photo gallery ,taking a photo shot, or selecting a from local files .
- Name - The name to be displayed by the Badge is required and will be used for identification indexing.
- Description - brief description (plain text format).
- Detailed infomation - This column is in RichText format. After clicking, an online editor will pop up. In addition to adding styles such as bold, color, hyperlink, etc. to the text, you can also insert images or videos.
- Mobile phone and email address - fill in your personal mobile phone and email address in this field so that the other party can contact you directly when sharing the page.
- Social links - You can set links to commonly used Facebook, Line, Instagram, Youtube, Twitter, Linkedin, Titok, or Wechat. The biggest difference between digital name cards and paper printed cards is this part, because it is impossible to print a list of URLs on the name card. Instead, just click on the icon of the social resource to share it immediately, add friends to each other, etc.
- Other links - Set the URL of special or resource you want to share; after the setting is completed, this part will be presented as a "button".
- VCF file - If you want to share your personal business card information, you can upload the vcf file ; after successful upload, a "cloud download" icon will appear in the upper right corner of the "Badge" homepage ; after letting the other party's phone scan the card, your Badge homepage will appears on their mobile phone, and then they can click this icon to add it to their contacts or address book.
- Background Color - You can change the background color of the card page.
- Every time you finish editing the data, don't forget to scroll to the end of the page and click OK to save and update it instantly.
- When you want to share, just ask the other person to scan your Badge card, and the previously set personal information will appear on his or her phone (no need to open the app)!
$
$ Fig.0-2
0-3.
Bind the Badge to the Phone
- First decide which Badge card you want to bind (you can follow this procedure to change other cards later), then scan the card to log in.
- Click the QR code icon in the upper right corner of the "My Data" page to start binding this Badge card.
- Enter the "Bind Badge" page, you can first check the QR-CODE where the Badge information URL appears, confirm and click below BIND MY BADGE to bind the mobile phone .
- After successfully binding to the App on this phone, please press OK in the dialog box that appears and return to the "My Data" page.
- You can press < on the upper left side of the "My Data" page to return to the homepage of the App. At this time, the homepage will be presented with the bound QR-CODE instead of the LOGO; that is to say, you can share this QR code immediately after the App is launched.
0-4.
Adding Widget of This App
The Badge link that has been bound to the mobile phone can be used to call the widget of this App and paste the QR code on the home screen of the mobile phone.
- Take the iPhone as an example: long press the blank space of the home screen to enter the state of editing the home screen ; at this time, press the + in the upper left corner to enter the editing widget page.
- Searching for "Badge" will find "Badge App" on the list, click on its item to confirm.
- Swipe the QR code display in the middle to choose the presentation style you like, then press + below to add a widget.
- At this time, the QR-CODE bound to the Badge App will appear on the home screen of your phone and can be used for direct sharing!
0-5.
Using NFC Tools
Use an NFC tag to set up an NDEF record and allow other NFC phones to scan it and share the contents of this record. Commonly used NDEF records can be used to set, for example: hyperlinks to websites , calling your own phone number , sending text messages or emails to mobile phones, and your own contact information ... etc.; in addition, you can also share the information here Wi-Fi hotspot, just sense the tag and you can automatically connect to and use the wireless network.
- Return to the "Badge" homepage, you can switch the function menu at the bottom, just tap the NFC.
- On the "NFC Assistant" page, the list of NDEF record items and Wi-Fi hotspots; And at the bottom, you can click "Learn more about NFC" to enter the NFC knowledge article on nfctogo.com.
- Click on the item you want to write to the NFC tag (taking WiFi records as an example) to enter its content setting page.
- On the "Write NFC Tag" page, after filling in each field, press WRITE NFC TAG to turn on the NFC scan function, move the blank NFC tag in the field and hold it until the writing is successful.
0-6.
To Send LINE Business Card
- Refer to Fig.0-6 below, the App scans your Badge card to log in.
- Enter the EDIT MY DATA , scrolling down the [LINE] section at the bottom, and pay attention to the restrictions of Line prompted to edit the data in each field, including: a. Name (can be a person's name or the name of an event), b. Description, c. Image (this picture will link to your Badge information URL), d. Buttons (link to interact with friends). Finally, don’t forget to scroll to the end of the page and press OK to complete the edit.
- Return to "My Data" page. There is a QR code next to the top title bar that can bind this card to this phone. You can use Line business card sharing the next time you open the App without logging in to the Badge card.
- Click the Line icon next to the title bar at the top of "My Data" page to start linking the Line account on your phone. After the login authentication is completed, you can select friends or groups to send!
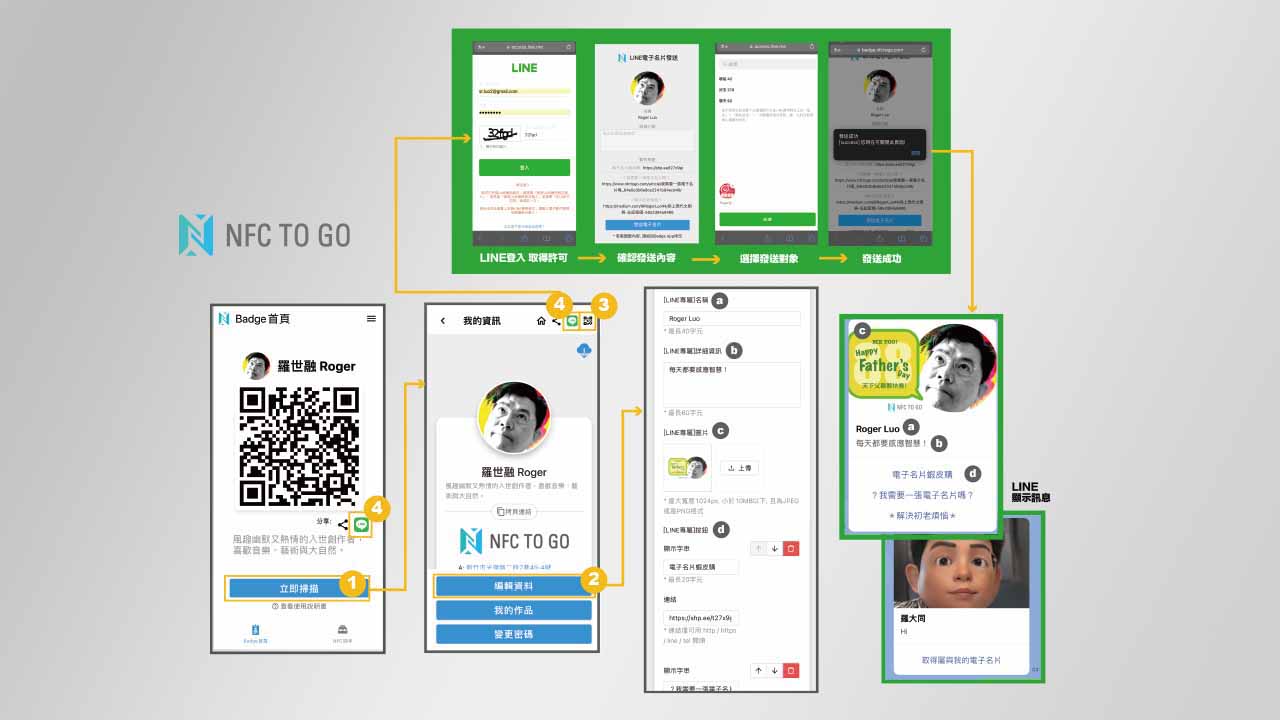
Your friends will receive your electronic business card (bottom right of the picture above). Clicking on the Hero picture will link to the Badge business card, brief description and setting button menu.
1-0.
Badge COMBO Card
In addition to being used as a general NFC name card, it also contains an account and password management, which can record your frequently used account names and passwords on the card.
- In "Badge" homepage, click MANAGE MY SCRETS and you will see a list of "Account/Password" pairs. The account name is displayed on the left of each item, and ******** is the password below it.
- Click the + in the upper right corner of this page to add a new piece of information; please fill in the name and password according to the prompts at the bottom of the field, and click CONFIRM when completed .
- There are function options on the right side of each item; click the "blue pen" to open the editing page. If there are any changes, please click CONFIRM & WRITE below to confirm .
- Press the "eye" to immediately display the password; press it again to hide it again.
- Click on the "clipboard" on the right to copy this password to the clipboard.
- After pressing the "trash can" on the right , the current item can be deleted. Please confirm whether to delete it in the dialog window.
- As long as there are any changes to the account information, the CONFIRM & WRITE below will turn blue, indicating that writing to the card is necessary in order to remember the previous edits and modifications. After pressing it, you will be asked to enter the card password again to confirm the permission. After passing it, please touch the original account and password card and keep it still until the screen shows that the update is successful.
- After completing the items browsing, you can click < above to return to the "My Data" page.
$
$